Skip to content
Washing Machine Manuals
Facebook Pinterest Twitter Instagram
  • Product History
  • NewsExpand
    • Washing Machine Sales/Deal Offer Schedule – Worldwide (August to December 2025)
    • GE Moves Washing Machine Manufacturing Units from China to Kentucky with $490 Million Investment
    • Samsung Launches Bespoke AI Top Load Washing Machines
    • U.S Washing Machines Market to Reach $8.91 Billion by 2030
  • BlogExpand
    • Save on Washing Machine Repairs: Practical Fixes That Cost Almost Nothing
    • Washing Machine Capacitor Problem? Diagnose and Replace It Like a Pro
    • Washing Machine Drum Not Spinning? Diagnose and Fix It Yourself – Step-by-Step Guide
  • Support 24/7
  • Language
SAVE MONEY
Search
DOWNLOAD FREE PDF
Washing Machine Manuals

Overview

A humming motor without rotation often indicates a capacitor malfunction. “A motor that barely moves or refuses to spin usually reveals a failing capacitor. Resolving capacitor faults offers a fast, affordable fix to restore washing machine functionality.
Inspecting and replacing a washing machine capacitor with a multimeter.

✦ Why Focus on the Capacitor?

Capacitor failure accounts for over 90 % of motor-start issues. With minimal cost and minimal effort required, diagnosing and replacing the faulty part effectively resolves the majority of drum spin problems.

Important Tools & Safety Measures

  • Digital multimeter (set to capacitance mode, if available)
  • 13 mm spanner for motor mounting bolts
  • Phillips and flat screwdrivers
  • Electrical gloves and insulated footwear
  • Non-conductive flashlight or headlamp
    Safety protocols:
  • Disconnect mains power before beginning
  • Confirm that the water has drained completely.
  • Dry your hands and remove metallic accessories.

Step 1 – Isolate the Faulty Capacitor:

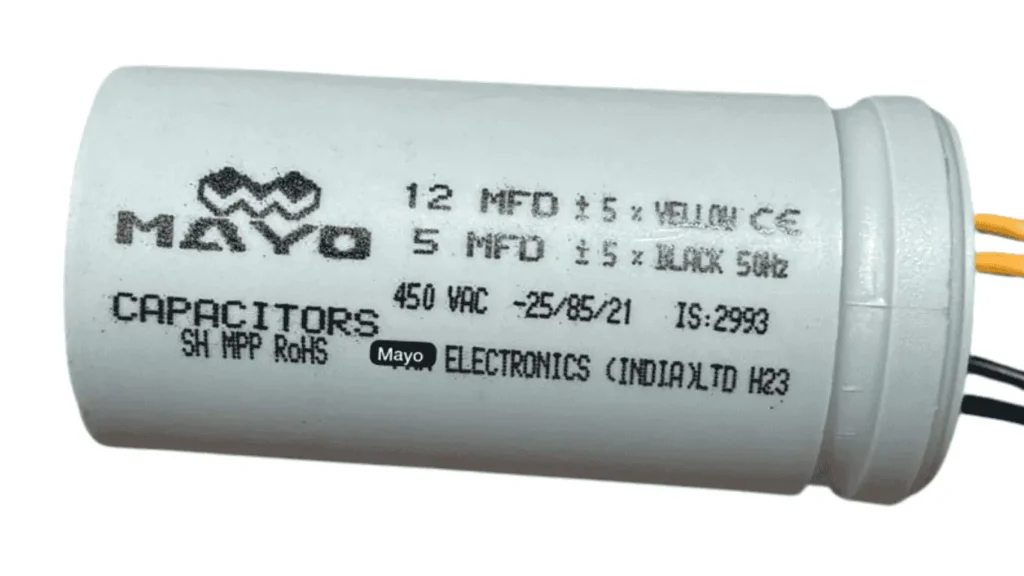
Once the machine’s rear cover is detached, identify the capacitor — typically a round metal or plastic component — mounted close to the drive motor. Visual inspection reveals swelling, signs of oil leakage, rust on terminals, or any bulging top. Any such anomalies strongly indicate capacitor replacement.

Step 2 – Testing Capacitance with Multimeter:

  • Switch the multimeter to capacitance mode (if supported)
  • Disconnect both capacitor leads.
  • Probe terminals: a reading significantly deviating from the stamped µF value signals depreciation
  • If capacitance test unavailable:
  • Set the meter to ohms (resistance) mode
  • Touch both multimeter probes to the capacitor terminals. If the screen shows ‘OL’ or infinite resistance, the internal coil is likely open or disconnected.

Step 3 – Removing the Defective Capacitor:

  1. Unbolt the mounting bracket using a 13 mm spanner
  2. Pull out capacitor carefully, avoiding contact with live components.
  3. Label capacitor rating (e.g., 4 µF ± 5 %, 450 VDC) for an accurate match

Step 4 – Installing the New Capacitor:

  • Verify replacement rating matches exact µF and voltage tolerance
  • Secure the new capacitor into the bracket and reattach both terminals firmly.
  • Confirm correct insulation; loose wiring leads to arcing or future failure.

Step 5 – Functional Verification:

  • Reconnect the rear panel and power up the machine
  • Initiate a spin cycle: smooth and immediate drum rotation indicates success.
  • If the motor still hums, inspect those belt connections and motor wiring next.

Professional Results:

  • Always opt for capacitors from reputable suppliers with a voltage rating equal to or higher than the original voltage rating.
  • Record part number and installation date — simplifies future maintenance.
  • Periodic preventive checks (once a year) help preempt unexpected failures.

Conclusion:

Capacitor failure represents one of the simplest yet most frequent issues behind a non-spinning washing machine drum. With minimal equipment, an accurate diagnosis followed by correct replacement restores operation swiftly. When executed methodically, this approach empowers effective DIY repair and spares unnecessary service calls.

By following this expert-generated guide, washing machine functionality returns, operating efficiency improves, and confidence in handling future issues builds.

How to Test a RUN or START CAPACITOR the CORRECT Way

Source: Craft Customs / Youtube

The video embedded above belongs to its original creator on YouTube. We’ve added it here only to support the steps explained in this blog. All written content in this post is 100% original.

Author: RepairTech Solutions Team

Our content is written by appliance repair experts and reviewed by certified technicians with over a decade of real-world experience.

Rate this page

  • Home
  • Top Brands
  • Financial Analyses

Looking for a washing machine manual? At washingmachinemanuals.com, we make it easy to find the manual you need. Our library includes over 5,790 washing machine manuals from leading brands, covering a wide range of models. Whether you’ve misplaced your manual or need help with setup and troubleshooting, simply enter the brand and model in our search bar to view, download, or print your manual instantly — all for free. We update our database regularly to ensure you always have access to the most accurate and up-to-date information.

  • About Us
  • Privacy Policy
  • Term & Conditions

© All Rights Reserved 2025 | www.washingmachinemanuals.com